...
- Login to the BeMyIT Store at https://research.cchmc.org/bmistore/.
- Use the "New Resource Request" menu on the top-left to choose the resource you want to request:
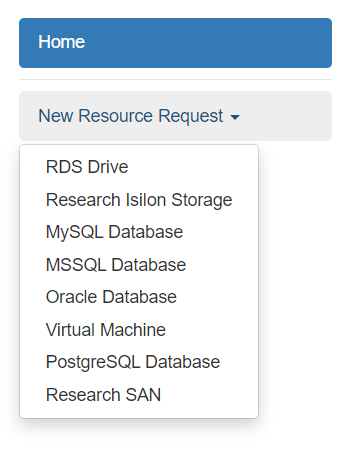
- RDS Drives are standard research network project drives and is only accessible by CCHMC employees on the CCHMC network or VPN. Examples:
- Spec Storage is housed on BMIISI and can be accessible to external collaborators and the HPC Cluster.
- Multiple database systems are available: MySQL, MSSQL (Microsoft SQL), Oracle, and PostgreSQL.
- Windows and Linux virtual machines are available as alternatives to physical servers.
- Fill out the Request Form with all of the required fields. Hover over the
 icon in the form to see additional help for each form field.
 - The following fields are required for all resources:
- Owner/Principal Investigator
- Resource Manager(s) - A resource manager can request quota changes to increase space available.
- Resource Name
- Server/Drive Space Size
- Associated Project
- There are additional required fields depending on the resource type:
- RDS & Spec Storage require you to select-
- Backup - Different backup types are available depending on the project needs and any archiving requirements.
- HPC access - Select "Yes" if the drive need to be accessible from the High Performance Computing Cluster (HPC Cluster).
- External collaboration - Select "Yes" if users external to CCHMC will need access to the drive.
- Database also requires-
- Environment - Please specify if the database is to be used for Production, Test, Development, Stage, or Disaster Recovery.
- Virtual Machines require the following fields-
- Memory - The size of memory/RAM needed to be available to the VM.
- CPUs - The number of CPUs assigned to the VM.
- Operating System - Specify if the VM should run Linux, Windows, or Windows Server as the OS.
- Environment - Please specify if the database is to be used for Production, Test, Development, Stage, or Disaster Recovery.
- RDS & Spec Storage require you to select-
- When you've completed all the fields on the page, click the Continue button at the bottom of the screen to review your request. If you've missed any of the fields, It will be marked in red text so that you can correct it.
- If everything looks correct on the review screen, click the Submit button to complete your request.
Request a Change to an Existing Resource (Quota,
...
Backup)
You must be designated as an owner or a Resource Manager to be able to view and submit changes for that resource.
...
- Login to the BeMyIT Store at https://research.cchmc.org/bmistore/.
- In the Resources area, look under the tab labeled "Manageable Resources" and find the resource you wish to change.
- Click the "Request Change" button to the right of the resource.
- Depending on the resource you've chosen, you can change the:
- QuotaBudget Number
- Backup
- Memory
- CPUs
- When you finish, click the Request Change button.
Add or Change a Budget Number
You must be designated as an owner or a Resource Manager to be able to view and submit budget number changes for that resource.
Follow the instructions below to add or change a budget number for an existing Resource using the BeMyIT Store:
- Login to the BeMyIT Store at https://research.cchmc.org/bmistore/.
- In the Resources area, look under the tab labeled "Manageable Resources" and find the resource you wish to change.
- Click the resource name/path or the Request Change button.
- Click "Budget" in the left-hand menu.
- In the Budget Information section you can Add a budget number, Delete a budget number, or change the Budget Allocation:
- Add a Budget Number
- Click the Add button to display the Add Budget Number window.
- The entry for budget number is broken-up into separate fields. Select or fill-in each of the fields: BU, Fund, Department ID, Project BU, Project ID, and Percentage.

- Click the Verify button at the bottom.
Look for a Success message at the top of the window when your budget number verifies.

Info title Budget Number Error If budget number does not verify, then send an email to help@bmi.cchmc.org with the budget number that you want to use, and we will take care of it for you.
- The Account, Budget Ref Yr, End Date, and Responsible Party fields will be auto-filled for you when the budget number verifies.
- Click the OK button at the bottom to close the Add a Budget Number window.
- Click the Save button under the Budget Information section to finish adding the budget number.
- Remove a Budget Number
- Click the checkbox next to an existing budget number in the list and then click the Remove button.
- Click the OK button in the popup to confirm you want to remove the budget number.
- Click the Save button under the Budget Information section to finish adding the budget number.
- Change the Budget Allocation
When adding a budget number you can specify how much of the charges will be allocated to it. The Percentage field defaults to 100% but can be edited while adding the budget number.- If you want to change the allocation after you've already added a budget number, just add your second (third, fourth, etc) budget number, set the Percentage, and save it.
- Then when you return to the main Budget Information section you'll see a message prompting you to change the allocations.

- Click the Budget Allocation button and the Update Budget Number Allocation window will appear.

- Reduce the Percentage field for the displayed budget number from 100% to the correct amount so that the total of all your budget number allocations will be 100.
- Click the Save button to close the Update Budget Number Allocation window.
- Click the Save button under the Budget Information section to finish adding the budget number.
- Add a Budget Number
Change the Owner or Resource Managers of an Existing Resource
...